Dashboard modules
Alabaster's dashboard has fifteen cards. This page describes what each card does and what settings are behind it.
Every card has quick settings on the card itself, and a full settings pane behind All settings. See how a card is built.
Print
The Print card shows the state of the current job and the controls for it.
- Progress, elapsed, and remaining: Also shows the time of day the print finishes.
- Layer and height: Current and total.
- Filament used: Compared against the file's total.
- Pause, resume, cancel, and Clear to return a finished job to ready.
- Slicer preview: Expandable.
- Recent files: Start the next print with one click.
- Up next: Shows what the job queue will start when this job finishes, and whether the queue is paused and won't start it automatically.
Drop a G-code file from your desktop onto the card to upload and start it.
The card shows Klipper's own reason for a failed or cancelled print. This is the same message that otherwise only appears in klippy.log. Select the text and paste it into a search.
Remaining time source
Choose the source in settings.
| Source | Based on |
|---|---|
| Best available | Whatever the printer supports right now. |
| The slicer estimate | The time your slicer wrote into the file when it sliced it. |
| File position | How far through the file the printer has read. |
| Filament used | Filament consumed against the file's total. |
The percentage follows whichever source you pick. The figure, the bar, and the drift warning always agree, including the percentage shown in the card's header when it is collapsed.
Use the slicer progress (M73) is a separate switch that applies to Best available only. If the file carries no M73 report, the settings panel states this.
Drift warning
Alabaster compares actual progress to the slicer's estimate and warns you when they diverge, for example 12% behind the slicer estimate (or ahead of it).
This warning is on by default and appears only once the print has diverged past the threshold. Set the percentage threshold in settings, or turn the warning off there.
Pause at a layer
Two options, both under the card's actions:
- Pause at a layer: Name the layer and the print pauses as it starts.
- Pause when this layer finishes: Use this for a color change decided mid-print.
Both options appear only on a printer whose configuration defines the macros they call. alabaster.cfg provides these macros, and so does an established Klipper web interface's own macro pack.
Exclude an object
If the file defines objects, Exclude object lists them and marks the one currently printing.
This action cannot be undone for the current job. The confirmation states this.
Also here
- Reset speed and flow: Choose separately for when a print completes, is cancelled, or fails.
- Maintenance overdue: Appears in this card's header. Turn on the reminder under Settings → Confirmations. With it on, starting a print into an overdue interval asks for confirmation first, however you start it: Print again, a recent file, an upload, or a dropped file.
- Confirmations: Confirmations for starting, pausing, and cancelling can be switched on or off from the card's own settings, or from Settings → Confirmations.
Camera
The Camera card shows any number of the printer's cameras. Choose per card, in the card's own settings, whether to tile them in a grid or show one at a time behind a tab strip. A grid runs every stream at once, for watching two angles of a first layer. Tabs run only the stream currently showing, for a phone on mobile data or a Pi that is also slicing.
Add another card to split cameras across more than one card, for example "the printer" on one card and "the filament path" on another. A camera already showing on one card is not offered to a second card, so nothing streams twice.
No camera configured, no camera chosen for a card, and a chosen camera switched off are three separate empty states. A stream that fails offers a retry instead of showing a broken frame.
A camera's address, streaming service, rotation, and crosshair are configured once, under Settings → Cameras, and shared by every card that shows it.
Temperatures
The Temperatures card lists every heater and temperature sensor the printer reports, with a target for each heater that supports one.
Arrival times
Alongside each reading, the card shows:
~4 min: When the heater will reach its target.8°/min: How fast the temperature is climbing.Not climbing: The heater has a target but is not approaching it.Almost thereandAt target: Shown near the end of the climb.
The estimate is based on the printer's own history: the actual time it took to cross each five-degree band on the way up, learned and reused. This accounts for a hot end that slows above 200 °C or a bed that slows through its last ten degrees, and works with both PID and MPC.
Adjusting one heater
±5 adjusts an active target by five degrees, and is the one temperature control that stays available while a job is running. Off switches that heater off.
Off, the material presets, and Cooldown are unavailable while a job is loaded, including a paused print. Each of these would end a paused print rather than pause it further.
A temperature_fan gets the ±5 adjustment but no Off control, since a target of zero would leave the fan running instead of stopping it.
Reading the past
Point at the chart, and every temperature in the list above it updates to show the value recorded at that moment. The whole table moves together, and the chart labels the moment it is showing. Arrow keys step through the same samples one at a time, and Escape returns to the present.
Target boxes do not follow this. They always show the printer's current setpoint, so no control here can act on a value from four minutes ago.
The chart
Turn on the history chart and choose what it draws.
| Setting | What it does |
|---|---|
| Sensors | Which sensors appear in the list, in the chart, or both. |
| Color | Each sensor's color, from the Okabe-Ito palette. |
| Height | Compact, standard, or tall. |
| Time window | How far back it goes. |
| Draw target temperatures | The setpoint each trace is climbing toward, as a dashed line. |
| Scale to current values | Or keep the scale fixed to the printer's configured maximums. |
| Start the scale at 0 | For reading absolute values rather than differences. |
| Draw heater power | Each heater's duty, on its own axis up the right-hand side. |
History is seeded from Moonraker's own temperature store when you connect, so the chart is not empty for the first ten minutes.
Material presets
Material presets are buttons that set the hot end and bed together. Add your own presets, or search the catalogue to pull real values for a filament. Leave one of a preset's two temperatures blank, and pressing the preset leaves that heater unchanged. This is useful for a filament that only specifies the hot end temperature.
Cooldown turns every heater off at once.
Heater calibration
Calibrate PID and Calibrate MPC run from the card, on the heater and at the temperature you choose (usually the material you print most).
The output appears as it runs. Once calibration finishes, the new model is staged in Klipper and the card prompts you to save the new config to keep it.
Heats the printer
Calibration runs for several minutes and heats the machine. It asks for confirmation before starting. It is unavailable while a job is loaded, including a paused print, because the heat-up cycle would end it.
Movement
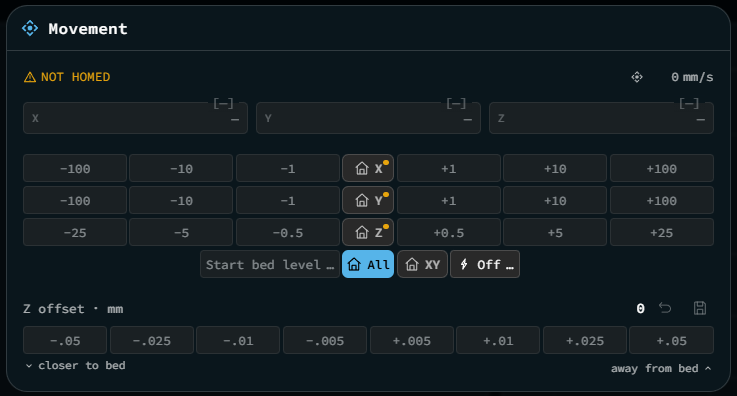
The Movement card controls position, homing, and everything that moves the toolhead.
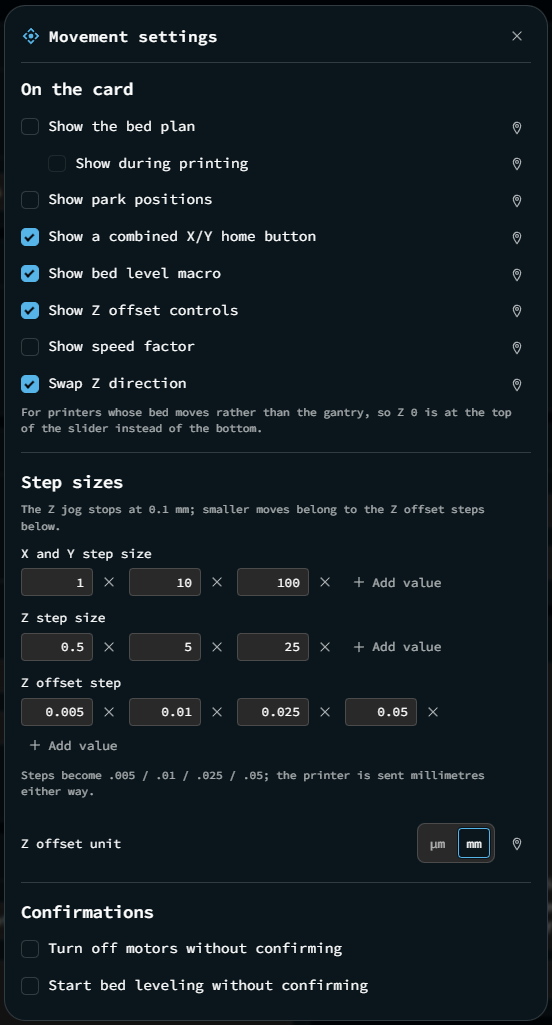
- Per-axis homing: Includes home all, with unhomed axes marked. A combined X and Y home button can be added beside it, for machines where re-homing Z is slow or disruptive.
- Jogging: Step sizes are configurable in millimetres. Add, edit, or remove values.
- Motors off: Asks for confirmation first, since the printer forgets its position.
- Park positions: Center and front.
- Speed factor: Includes a reset to 100%.
- Position mode: Shows absolute or relative, as reported by the printer.
- Live speed: Shows the toolhead's live speed, so a slow move and a refused move look different.
Jogging keeps working while a print is paused, since reaching the nozzle is often the reason for pausing. Homing, motors off, and bed levelling do not: each of these ends a paused print instead of interrupting it.
The bed plan
The bed plan is a picture of the actual bed. Press a spot, or drag to adjust it without lifting, or use the arrow keys, then press Go to send the nozzle there. Double-click or the Enter key do the same thing. Pressing a spot only aims the move; this is the one control that can send a move straight across the bed, which is a crash risk over a printed part.
Before homing, the plan shows the position as unknown rather than drawing a nozzle at a possibly incorrect location. It can be set to show or hide during printing.
On a delta, rotary delta, or polar printer, the plate is drawn as the circle it actually is, and a spot picked near a corner is pulled in to the nearest point on that circle rather than sent as a move the machine cannot complete.
Hovering over the plan or the Z slider beside it previews that coordinate in the corner reading, without moving anything.
Z offset
The controls read in micrometres or millimetres, and the legend states which direction moves the nozzle closer to the bed. Getting this wrong risks the nozzle.
- Steps: Set in your chosen unit; the printer always receives millimetres.
- Swap Z direction: For printers whose bed moves rather than the gantry, so Z zero is at the top of the slider.
- Save offset: Folds the current adjustment into whatever sets Z zero on the machine: the probe's own Z offset if there is a probe, or the Z endstop position if there is not. A printer with neither has no place to save it, so the control is not shown.
An applied offset that has not been saved shows this: applied to the probe, save the new config to keep it.
Bed levelling
Run whichever of these your printer supports, from the card:
| Action | Klipper feature |
|---|---|
| Level gantry | QUAD_GANTRY_LEVEL |
| Adjust Z tilt | Z_TILT_ADJUST |
| Check bed screws | SCREWS_TILT_CALCULATE |
| Adjust bed screws | BED_SCREWS_ADJUST |
| Calibrate delta | DELTA_CALIBRATE |
Screw results are shown as a table of turns and minutes, clockwise or counter-clockwise, against the reference screw. All of these actions ask for confirmation before starting.
Check bed screws can also get a shortcut beside home all, for a check run often between prints. Turning this on moves the button rather than duplicating it; it still appears only once.
Adjust bed screws moves the nozzle to each screw in turn and waits. A prompt names the screw it is standing at and how far through the round you are. Answer Accept, Adjusted (if you turned it enough to matter, which restarts the round because that screw changes the others), or Abort. If you dismiss the prompt to do something else, the header keeps a way back to it.
On a gantry printer, the card shows when the gantry has not been levelled since the motors were last turned off. Every axis reads as homed even on a machine that is out of square, so this is the only warning you get before the first layer comes out thick at one end.
Controls
The Controls card shows fans and output pins.
- Part fan and every other controllable fan.
- Fans Klipper controls: Fans Klipper drives itself are shown read-only, so you can see what a heater fan is doing without being able to override it.
- Output pins: Shown as toggles or levels, depending on how each pin is configured.
Giving an output an icon
Under Icons in the card's settings, each fan and pin can carry one of five icons: Fan, Light, Probe, Temperature, or Power. A row can also have no icon.
An output pin's name is whatever it is called in printer.cfg. A list of pins named things like output_pin caselight is hard to scan; icons make each row identifiable at a glance.
A fan starts out with a fan icon by default. A pin starts out with no icon, since a pin can control anything and guessing its function was often wrong. Any row, including a fan, can be set to no icon.
Machine
The Machine card shows the motion limits, live.
| Limit | Unit |
|---|---|
| Velocity | mm/s |
| Acceleration | mm/s² |
| Square corner velocity | mm/s |
| Minimum cruise ratio | ratio |
Two settings prevent a limit change from becoming a hazard: lock the limits while printing, and reset them when the print completes, is cancelled, or fails (chosen separately per outcome), so a tweak for one job does not silently become permanent.
Macros
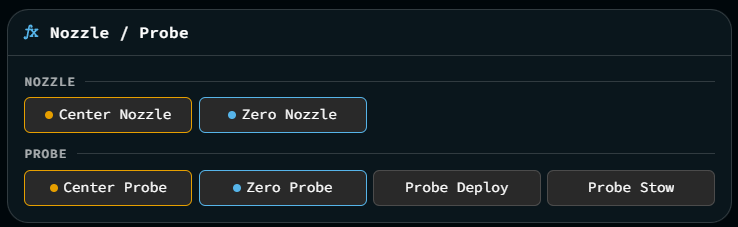
The Macros card shows the macros you choose, as buttons.
- Search and pick from everything the printer reports.
- Order the buttons the way you use them.
- Color each button from the Okabe-Ito palette.
- Run with parameters: A macro that takes arguments opens a small form. An empty field lets the macro apply its own default.
- Missing macros are marked rather than silently dropped, and can be hidden once you no longer need to see them.
Groups
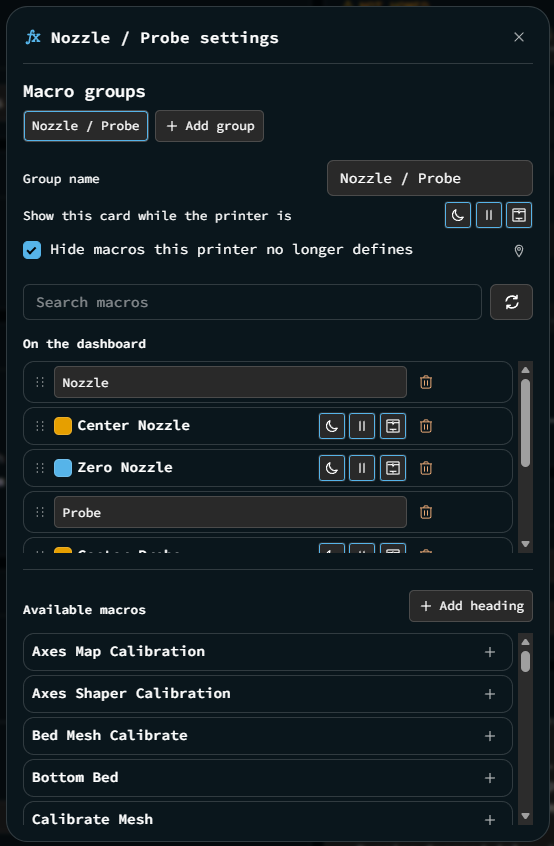
This card can appear more than once, each instance with its own name and its own macros.
Each group can be set to show only while the printer is idle, paused, or printing. This keeps pre-print macros out of the way mid-job, and shows mid-print macros only when they are useful.
Headings
Split a long list into named sections, directly on the card.
A heading is part of the same list as the macros: drag, reorder, or delete it with the same controls a macro already uses. Add heading stays pinned above the available-macros list, reachable without scrolling regardless of how long the printer's macro catalogue is.
An emptied heading still shows as a bare rule rather than disappearing, so the card never appears to have dropped something the settings pane still lists.
Extruder
The Extruder card controls extruding, retracting, and the tuning that goes with them.
- Extrude and retract: Set a length and feedrate. Disabled below the minimum extrusion temperature, and shows that temperature.
- Extrusion factor: Includes a reset to 100%. Klipper carries this value from one job to the next, which is why the collapsed card always shows it.
- Macro buttons: Pick whatever your load and unload macros are called. Klipper defines no load/unload macros of its own, so this is a picker rather than a fixed pair.
Pressure advance
Set the advance and smooth time; the active value is shown.
If the model is set in printer.cfg instead, the card reads the values rather than adjusting them. A value set from the card is lost on restart, and the card states this.
Firmware retraction
If [firmware_retraction] is configured, the card shows retract length and speed, unretract extra length and speed, and Z hop height.
Spool
The Spool card requires Moonraker's Spoolman component. The card does not appear without it.
- Active spool: Shows its filament, and what is left by weight and by length.
- Switch spool: From the card.
- Enough for the next print: Shows a warning such as not enough filament left, needs 340 g, this spool has 210 g.
- Temperature mismatch: Warns when the loaded filament is set for 215 °C and the next file heats the hot end to 250 °C.
- Pause automatically: Pauses the print when Spoolman reports the spool is empty.
Spoolman's number, not a sensor
The remaining weight comes from Spoolman's own tracking. It is only as accurate as what Spoolman knows, and it is not a runout sensor.
Sensors
The Sensors card requires Moonraker's generic sensor component ([sensor] in moonraker.conf). The card does not appear without it.
- Every configured sensor: Shows its current reading, live. This includes a power meter, an environmental probe, or anything else reporting through Moonraker rather than through Klipper.
- A sensor that reports more than one value shows each value on its own line, named after the value itself.
Different source from Temperatures
Temperatures reads Klipper's own heaters and temperature_sensor objects. This card reads whatever is configured in moonraker.conf instead.
printer.cfg does not populate this card
Klipper has no generic [sensor] section, so nothing added to printer.cfg populates this card. Temperatures already covers that data. A sensor here comes entirely from Moonraker's own moonraker.conf. Moonraker's sensor component currently only reads values over MQTT: configure an [mqtt] section first, then add a [sensor <name>] block with type: mqtt naming the topic to subscribe to and how to parse its payload. See Moonraker's own sensor configuration reference for the full syntax, including worked examples for a Shelly power meter and a Tasmota smart plug.
Bed mesh
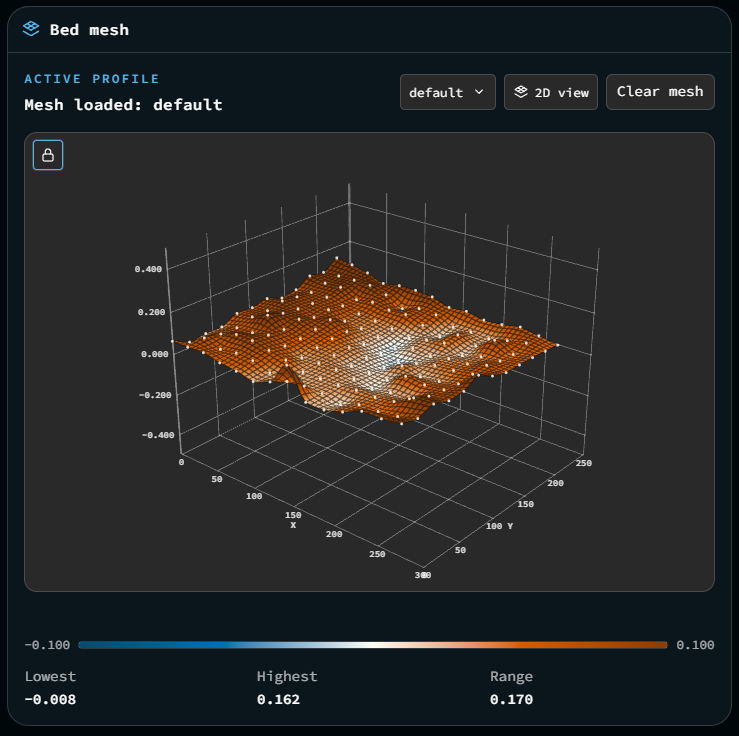
The Bed mesh card shows the measured bed as a map.
- 2D map: Top-down view, always available.
- 3D height map: Includes ten projections (perspective, orthographic, isometric, dimetric, trimetric, cavalier, cabinet, one-point, two-point, fisheye) and five render styles (surface, bars, contour, terraced, mosaic).
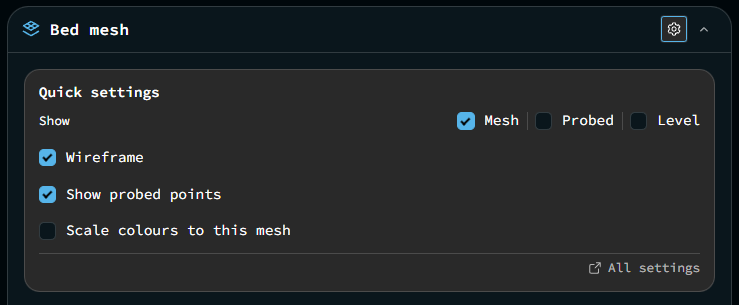
- Probed points, the mesh, and a level reference: Each can be shown or hidden.
- Readout: Shows X, Y, and height wherever you point.
- Lowest, highest, and range: Shown as numbers, not only as colors.
The color scale
There are two modes:
- Scaled to this mesh: Uses the full color range for a single mesh.
- Fixed scale: Set a fixed value so two meshes can be compared directly. Two meshes each scaled to themselves cannot be compared, since their color ranges differ.
Two warnings
- Bed range: Warns when the bed varies by more than the threshold you set. Set the threshold to zero to turn this warning off.
- Probe temperature drift: Warns, for example, this mesh was probed at 60 °C, but the bed is now targeting 100 °C. Recalibrate before trusting it. A mesh measured cold and used hot is inaccurate, and this is the only warning for it.
Profiles
Load, save, rename, and delete meshes on the printer. A mesh that has only been calibrated (not saved) is lost on the next restart, and the card warns you of this.
See the Calibration page for more mesh tools.
Job queue
The Job queue card controls Moonraker's queue.
Start, pause, clear the queue, or remove individual jobs. Drop a file from your desktop onto the card to upload it and add it to the end of the queue.
Console
The Console card is a compact console on the dashboard: recent output and a prompt.
It includes the two filters used most often mid-print, and a setting for how many lines to show. The full set of filters and display options is on the Console page. The card and the page keep separate settings, so a quiet card and a verbose page is a valid combination.
Activity
The Activity card shows what the printer has been doing: state changes, prints starting and finishing, and commands sent.
Every event is shown with a symbol and text, never color alone.
Maintenance
The Maintenance card tracks service intervals against the printer's own lifetime totals.
Add an interval and choose what measures it:
| Measured by | Counted from |
|---|---|
| Print time | Hours the printer has spent printing. |
| Filament | Metres extruded. |
| Calendar | Days since you last performed it. |
Each interval shows what is left (in 40h, in 120 m, in 12d) or how far overdue it is (18h over).
Performed resets the interval from now. A newly added interval needs a baseline before it can count, and the card states this.
The overdue print reminder
Switch on Ask before starting a print while a maintenance interval is overdue under Settings → Confirmations. With it on, starting a print while an interval is overdue asks for confirmation first, whether you start from the Print card or from Print files. Choose Open Maintenance, start anyway, or wait.
This reminder is off by default, since it interrupts starting a print. Start anyway dismisses it until tomorrow. Not now dismisses it for a week, for an interval you already know about and have parts on order for.
The Print card also shows an overdue warning in its header. The collapsed Maintenance card reads Overdue, never a count, since even one overdue interval needs attention.